We occasionally feature guest bloggers who can offer insights into different workflows. For the beginning documentary filmmaker, managing Final Cut Pro (FCP) workflows in a foreign language in combination with InqScribe can be daunting at first. This is why we asked Chad Braham, an experienced InqScribe and FCP user to describe his workflow in detail. While you may find that your specific workflow needs to be slightly different, we hope that this offers some insight into one approach, or gives you some ideas about how you can set up your own.
Hi, my name is Chad Braham. I’m a media producer, filmmaker, and a big fan of InqScribe. So when Inquirium invited me to write about how I create subtitled sequences using FCP 7 and InqScribe, I jumped at the chance.
This tutorial is written for the beginner filmmaker and focuses on timecode syncing and template editing. This tutorial will teach you how to:
- set up a workflow for adding subtitles to all of the clips in an FCP project;
- assemble a custom InqScribe Export Template in FCP for subtitle slide creation;
- and produce subtitled sequences in FCP that you can use to put together your film.
This workflow is particularly useful when working with foreign languages. The addition of subtitles makes it possible for an editor not familiar with the language to put together a film. This process can be applied to projects using full-resolution/online versions of clips, or low-resolution/offline versions (ProRes Proxy).
Step 1:
Create a new bin and sequence
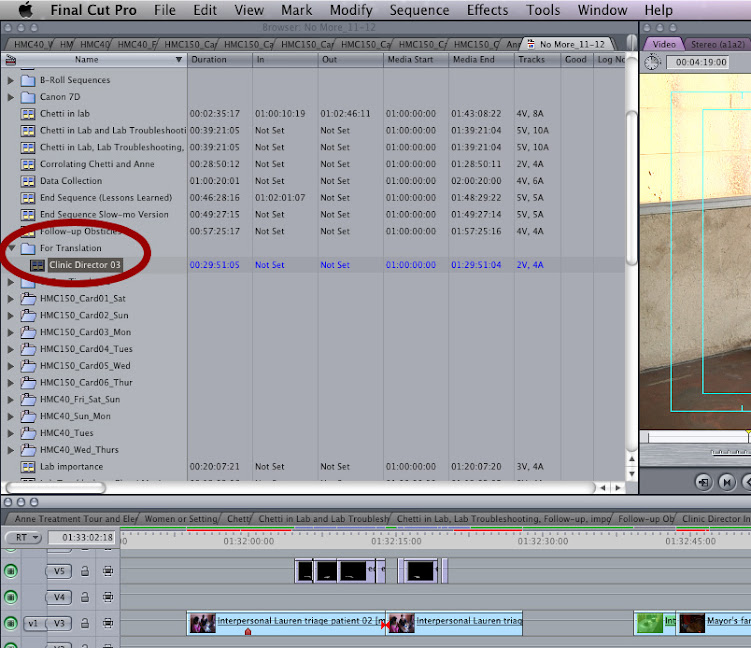
A. In FCP, create a new bin in your project to keep copies of the clips to be translated and subtitled: File > New > Bin. Name the bin “For Translation.”
B. Create a new sequence in the “For Translation” bin:
1. Choose a clip that needs to be translated from your project.
2. Select the “For Translation” bin and then choose File > New > Sequence.
Example: We named our clip “Interview Clinic Director 03” and named the sequence “Clinic Director 03.”
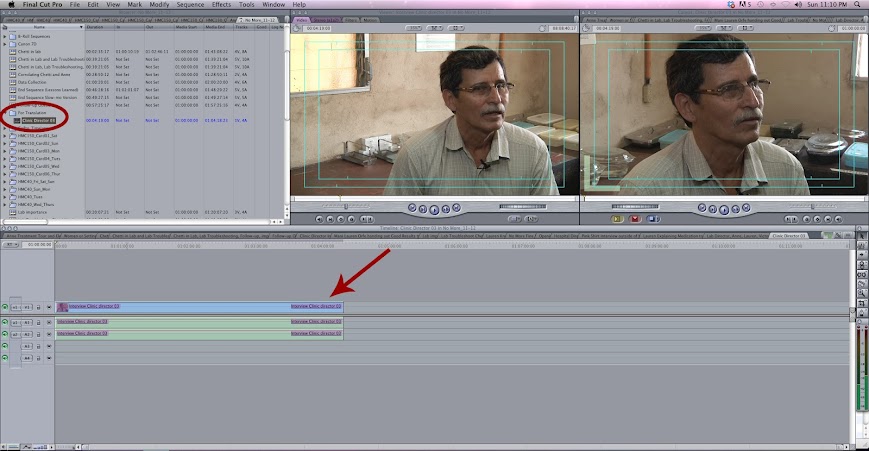
C. Overwrite-Edit the clip to be translated on to V1 and A1/A2 at the very start of the new sequence in the timeline.
Tip: You can also export a clip directly from FCP without putting it in a sequence to be prepped, which will produce the same result: A sequence that includes the clip on V1 and the subtitle on V2. Creating the sequence now and prepping the clips is a best practice.
Step 2:
Prep the sequence for export
A. Insert the “Timecode Reader” filter on the sequence by selecting the timeline window with the appropriate sequence and choosing Effects > Video Filters > Video > Timecode Reader.
B. Tweak the filter’s parameters and copy it to your “For Translation” bin for use on other translations:
1. Double-click the clip in video track 1 (V1) in the “Timeline” to load the clip into the “Viewer” window.
2. Choose the “Filters” tab in the viewer window for filter settings. We chose these “Timecode Reader” settings: “Size” = 12, “Center” = 0 – 468.5.
3. Apply the filter by dragging it from the viewer into your “For Translation” bin.
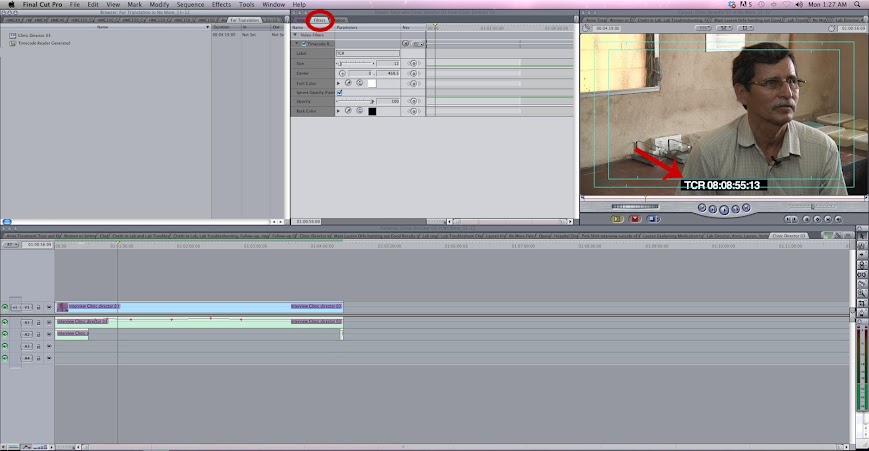
Tip: Having timecode “burnt” onto the video file can be very useful. It can serve as a reference to crosscheck when importing subtitles and when collaborating or sharing low-res (raw) clips from a project. The presence of timecode on a clip reminds people (including opinionated clients) that the clip is for reference only and not ready for general public distribution.
C. Do a rough mix of the audio in the sequence to ensure that the translator can hear the audio clearly. We isolated the mic on track A1 for the interviewee and kept the interviewer’s mic on track A2, only at the open and close of the clip so we had context for the interview content.
Step 3:
Export the sequence into a low-resolution clip for transcription
A. Set In-and-Out points at the start and end of the clip in the sequence. The accuracy of the In-and-Out points is vital to having your subtitles sync to this clip later on:
1. Click on the clip in the video track (V1) in the sequence.
2. With the clip selected, choose Mark > Mark Selection.

B. Export the sequence by selecting File > Export > Using QuickTime Conversion:
1. When the “Save” dialog appears, choose “Options” from the lower-left corner of the box to open the “Movie Settings” dialog.
2. Settings will largely be dependent on the native format of the video you are editing in FCP. In our example, the native format is 1080p 23.98fps – audio at 48khz. To downsize from this widescreen aspect ratio we used these settings:
– Video Settings –
Compression Type: Photo – JPEG
Depth: Color
Frame Rate: “Current” fps
Quality: Medium
Video Size > Dimensions: Custom 320×180
– Sound Settings –
Format: Linear PCM
Channels: Mono
Rate 48.000 kHz
Render Quality: Normal
Linear PCM Settings – Sample Size: 16 bits (Little Endian)
– Deselect “Prepare for Internet streaming”
Tip: There are modern video compression types such as H.264. As beautiful and compact as the newer compression codecs are, they are also processor intensive during playback. On some computers, especially older ones, this can adversely affect the performance of InqScribe, causing the video to skip or the audio to drop out. We found the Photo – JPEG compression to be more reliable, even on older PCs.
Step 4:
Create subtitle template and organize bins and sequences
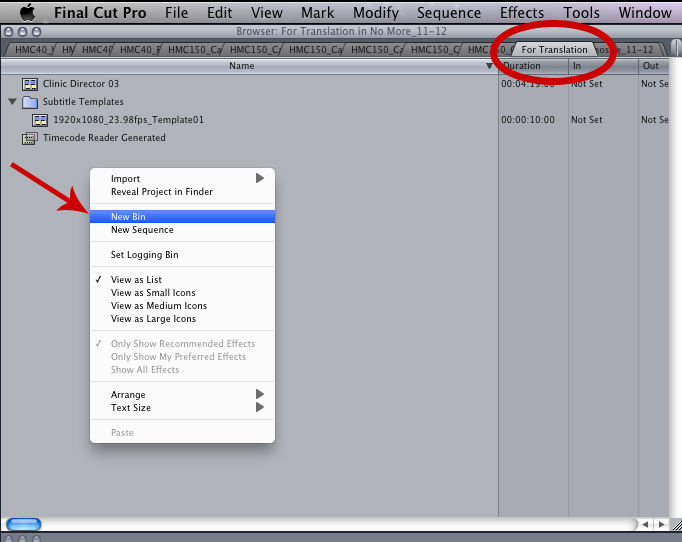
A. Create a sub-bin inside of your “For Translation” bin and name it “Subtitle Templates:”
1. Select the “For Translation” bin and control-click on the title and choose, “New Bin” from the drop-down menu.
2. Select the new bin and name it “Subtitle Templates.”
B. Create a new sequence in the “Subtitle Templates” bin:
1. Select the “Subtitle Templates” bin and control-click on the title and choose “New Sequence” from the drop-down menu.
2. Open the “Subtitle Templates” bin and rename this new sequence using the same name as the 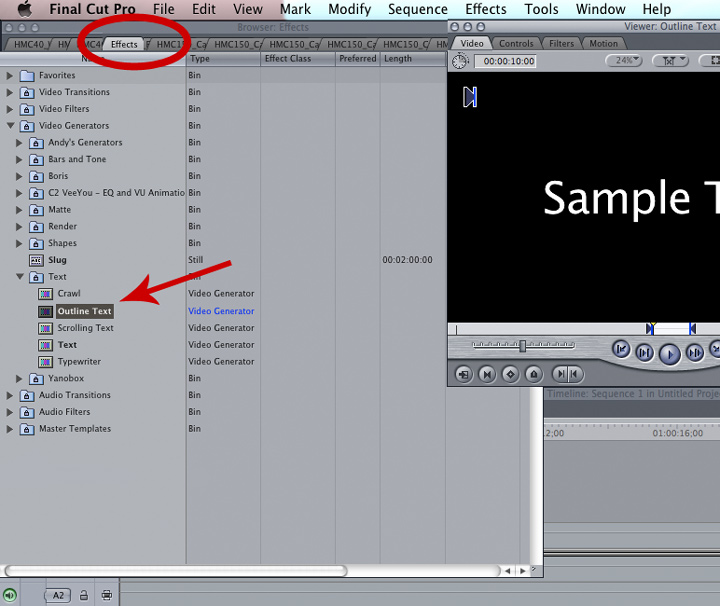 format of your project. In our example: “1920x1080_23.98fps_Template01.”
C. Add a single Text Generator and adjust the text generator font, settings, etc.:
1. In the “Browser” window, click on the “Effects” tab.
2. Open the “Video Generator” folder by clicking on the disclosure triangle.
3. Open the “Text” tab by clicking on the disclosure triangle.
4. Double-click the “Outline Text” generator.
5. Choose the “Controls” tab from the “Viewer” window to set the characteristics.
Here are some recommended settings:
Font: Arial Narrow
Style: Plain
Alignment: Center
Size: 23
Tracking: 3
Leading: 0
Aspect: 1
Line Width: 50
Line Softness: 38
Center: 0, 326 (You may need to adjust the center Y point depending on the size of your movie)
Text Color: White
Line Color: Black
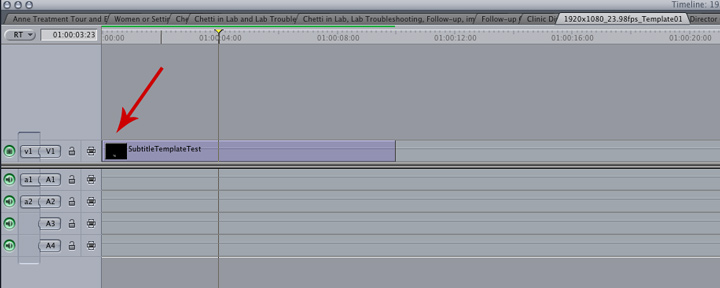
D. Overwrite-Edit the Outline Text video generator from the “Browser” window into the very beginning of the sequence timeline.
Step 5:
Save the sequence
InqScribe can export certain types of XML files that FCP 7 can display as subtitled text on top of your original video clip. But first, you need to define a template of the text for InqScribe in a format that matches your project. Refer to InqScribe’s detailed support document on creating a FCP 7 subtitle template when troubleshooting any template issues.
Step 6:
Export the subtitle template sequence as an XML template for use in InqScribe
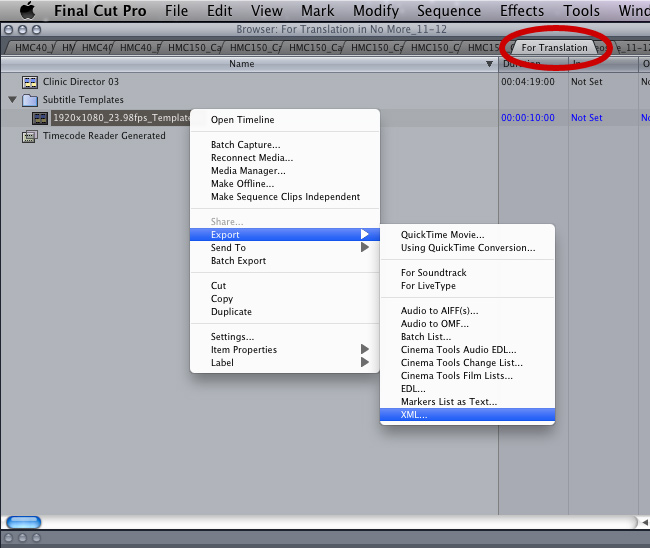
A. Choose the subtitle template sequence located in the “Subtitle Templates” bin (“1920x1080_23.98fps_Template01,” in our example). Control-click on the title and choose “Export > XML…” from the drop-down menu.
B. Select “Apple XML Interchange Format, version 1” in the export dialog box.
C. Click “OK.”
D. If prompted, Save the project.
E. You’ll then be prompted to save the XML file. For this example, lets call it “ClinicDirector_InqScribeTemplate.xml.”
Step 7:
Send the file to the transcriptionist
In most cases, transcription work is performed by someone other than the filmmaker. The beauty of InqScribe is that it is so easy to use even people who have never subtitled or transcribed before can get the job done efficiently. By marking timecodes for each short phrase, the translator creates the subtitles in InqScribe as well.
It is best to keep the instructions to the translator as simple as possible; you want him/her to focus on translating, not the technical issues. In the next step, the filmmaker will open the translator’s InqScribe file (.inqscr) and make any necessary adjustments. For our workflow, the exchange between translator and filmmaker looks like this:
A. The filmmaker sends the timecode burn-in reference movie and notes to the translator (in our example, the timecode burn-in reference video file that was exported in Step 3):
1. Use a service like Google Drive or Dropbox instead of email to send the video files.
2. If possible, send notes to the translator to provide some background on each clip, such as who the person is in relation to your film, an overview of the questions asked, the setting, etc.
B. The translator launches InqScribe, imports the timecode burn-in reference video, and sets the frame rate of the video (see details below).
C. The translator transcribes the video making sure to put timecode stamps after each short phrase. You want to break up the transcription into many pieces for the purpose of subtitles.
D. After the translator is finished transcribing the video clip, only the .inqscr translated file needs to be sent back to the filmmaker (this file is usually small enough to be attached to an email). Having the source .insqscr file allows you to make last minute tweaks and troubleshoot any exchange issues that may arise.
Step 8:
Export FCP XML from InqScribe
This step picks up after the initial transcription is complete, and assumes that the translator has delivered the completed transcript with plenty of timecode stamps to break up the text into small phrases for subtitles. The filmmaker will repeat many of the steps in InqScribe that the translator has done, just to ensure that everything is in order for the FCP XML export:
A. Launch InqScribe and open the transcript.
B. Be sure the frame rate matches your project:
1. Select the “Transcript Setting” button on the top right of the InqScribe interface.
2. Select the correct frame rate from the transcript settings dialog.
C. Set the Media start time to match the timecode window burn on your video clip:
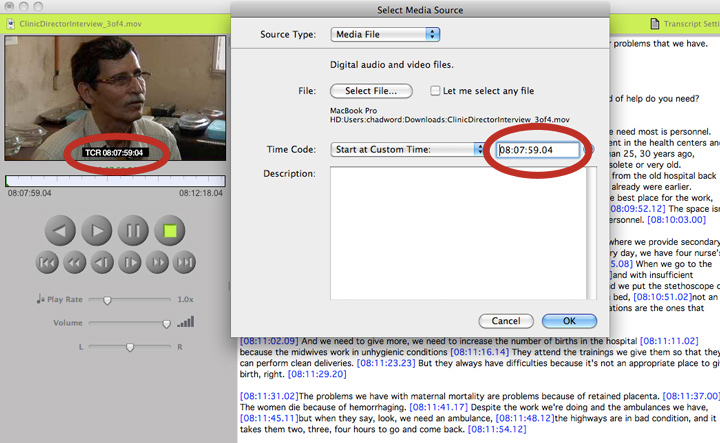
1. Open the Media Source dialog: Media> Select Media Source.
2. In the dialog box, choose “Start at Custom Time:” from the “Timecode” drop-down, and type in the timecode that is burnt on the opening frame of your video file. This setting will ensure that any new timecode marks you put in will match your timecode.
D. Match the timecode in the transcript to the video timecode. For example, if your transcript timecodes start 0:00:00.00, but the time stamp starts at 0:01:12.00, then you want to adjust the transcript’s timecodes to match your clip’s time.
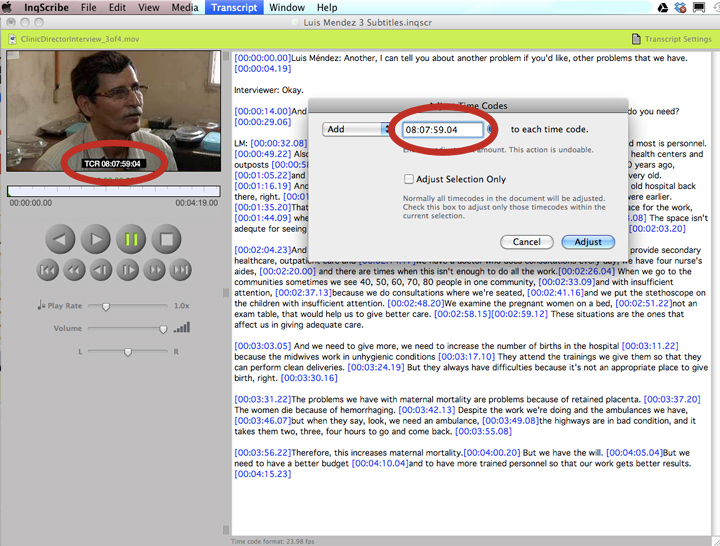
1. Open the “Transcript Settings” dialog: Transcript > Adjust Timecodes.
2. Choose the “Add” option from the drop-down menu and enter the start time from your video clip’s timecode burn-in window into the timecode field. If your transcript timecode doesn’t starts at 0:00, then enter the difference between the transcript timecode and the clip’s timecode.
NOTE: Unfortunately, FCP can run into problems if the timecode is greater than 12 hours (eg. 12:09:22:15). If the timecode is greater than 12 hours, apply steps C and D AFTER the transcript is exported as an FCP XML.
Tip: Before exporting an XML file, it’s often a good idea to make sure that the timecodes provided by the translator are not out of sequence (this actually happens fairly often) by exporting as HTML first.
E. Export the FCP 7 XML:
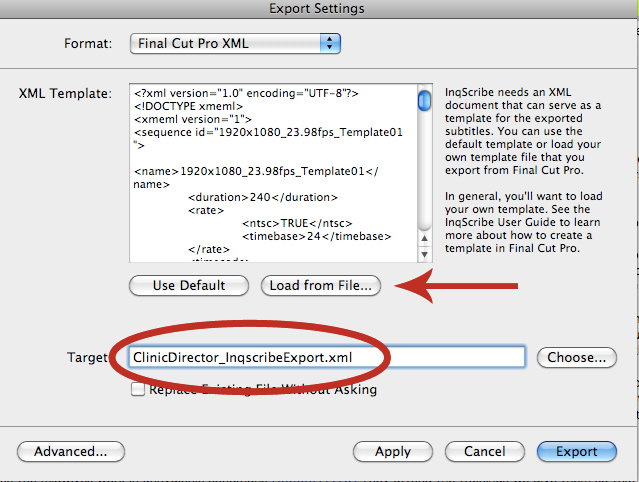
1. In InqScribe, select File > Export > Final Cut Pro XML to open the export dialog.
2. Click the “Load From File…” button in the export dialog to choose the template file that was exported from FCP (“ClinicDirector_InqScribeTemplate.xml,” in our example).
3. In the “Target” field, rename the file so you can easily find it (“ClinicDirector_InqScribeExport.xml”). Click the “Export” button.
Tip: Before leaving InqScribe, it’s a good idea to also export a tab-delimited version of the transcript with the proper timecode that is burnt into the timecode window. This can be matched against camera recorded timecode for referencing clips in the future. Again, if your timecode was greater than 12 hours, go back and set the timecode following steps C and D before exporting the tab-delimited version.
Step 9:
Import the Subtitles XML from InqScribe into FCP 7
A. Open your FCP project.
B. Create a new sub bin in the “For Translation” bin of your project and title it “Subtitles Temp.”
1. In the “Browser” window, open the “For Translation” bin.
2. In the “For Translation” bin control-click on an empty area in the far left column and choose “New Bin” from the drop-down menu.
3. Title this bin “Subtitles Temp.”
C. Import the subtitles XML exported from InqScribe (created in Step 6):
1. Choose File > Import > XML… and select the exported XML (“ClinicDirector_InqScribeExport.xml,” in our example).
2. Leave the default settings and click “OK.”
NOTE: In FCP, the XML file exported from InqScribe is renamed automatically to the original template name with the word “InqScribe” at the end and placed in the main project window. For example: “1920x1080_23.98fps_Template01_InqScribe.”
D. Rename this file to what it was when exported from InqScribe by selecting the filename in the FCP project and replacing with: “ClinicDirector_InqScribeExport.”
E. Drag the clip into your “Subtitles Temp” sub bin located in your “For Translation” bin.
Step 10:
Sync the original video clip to your subtitles
A. Open the subtitle sequence you placed in the “Subtitles Temp” bin by double-clicking the title (“ClinicDirector_InqScribeExport,” in our example) and prep the subtitles to be copied and pasted onto your video clip sequence:
1. With the subtitle sequence open, make sure the first frame of the subtitle is extended all the way to the very beginning of the sequence (this will ensure that the sequence stays in sync when copied).
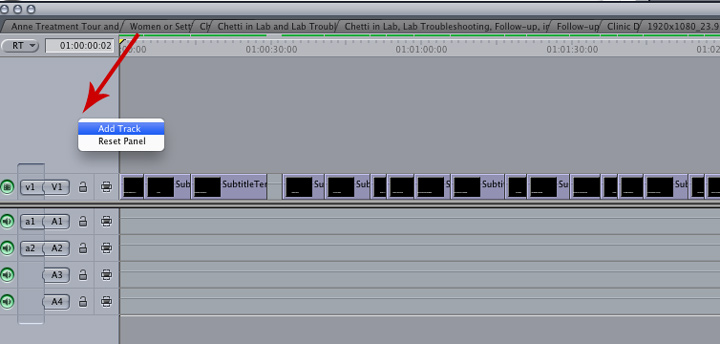
2. Create a new video layer by control-clicking on the far left-hand column in the “Timeline” window above the “V1” label in this sequence and choose “Add Track” from the drop-down menu.
3. Select all of the subtitle slides by choosing Edit > Select All and click -drag them to video track 2 (V2). Be sure that all of the titles are selected and that the selection is kept in sync to the opening of the sequence (there should be no gap between the opening of the sequence and the start of the first subtitle).
4. With all of the titles still selected, choose Edit > Copy.
B. Place the selected subtitle slides on top of the video clip sequence:
1. Open the video sequence to be subtitled from the “For Translation” bin in Step 1. In our example, the sequence “Interview Clinic Director 03” is located in the “For Translation” bin.
2. Create a second video track on the video sequence by control-clicking on the far left-hand column in the “Timeline” window, above the track “V1” label and choose “Add Track” from the drop-down menu.
3. Move the timeline play head to the beginning of the sequence in the “Timeline” window by selecting the “Timeline” window and choosing Mark > Go to > Beginning.
4. With the play head at the beginning of the sequence (to keep in sync) paste the subtitles by choosing Edit >Paste. The subtitles should insert on video track 2 (V2) above the video on (V1).
C. With the “Timecode Reader” filter still active on the original video clip in video track 1 of your sequence (V1), you can cross-reference the timecode with the timecode marks in your original InqScribe transcription to make sure that everything matches.
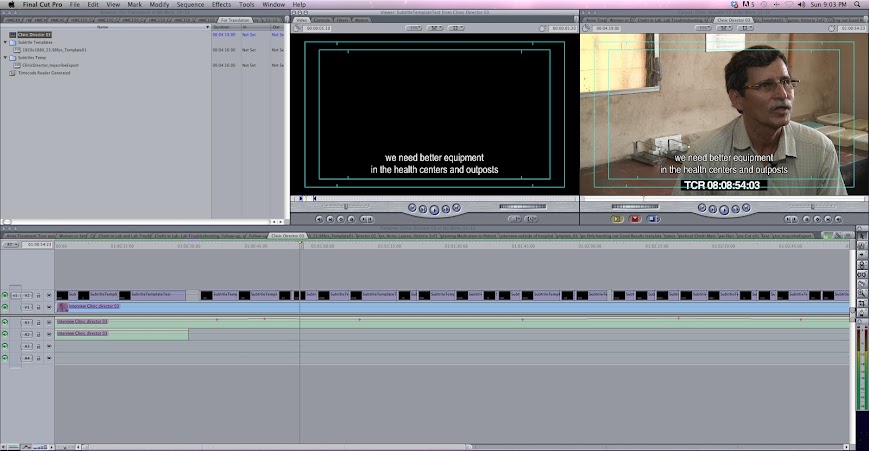
D. Once you have everything lined up in the sequence, you can hide the “Timecode Reader” filter:
1. Double click the clip in video track 1 (V1) in the “Timeline” window to load the clip in the “Viewer” window.
2. Choose the “Filters” tab in the viewer window and uncheck the box next to “Timecode Reader.”
E. For each additional clip/interview that you need subtitled, you can repeat most of the steps above, re-using the XML template created in Step 3.
Once your subtitled sequence is completed in FCP, you can play through the sequence, tweak the subtitles and drop markers to designate “Subclips” that you want to highlight within the clip to organize the content. When ready, you can mark In and Out points from segments of this sequence and edit them into your main edit sequence as you begin to build your film.
As stated earlier, this tutorial is based on an on-line/full-resolution workflow. If you plan on using an off-line workflow (such as logging and capturing offline RT first and then converting to a higher ProRes later) the workflow is the same, except you will need to conform the sequence to the full resolution media. The beauty of this FCP/InqScribe workflow is that it relies on FCP’s text generator, which will rebuild the subtitles to match the resolution of whatever FCP sequence you copy and paste them into (no re-exporting from InqScribe/FCP required).
Read more about:
• The process of using the “Media Tool” in FCP7 to conform ProRes Proxy media to Full-res media in your project. (PDF)
• FCP7 Offline/Online workflows.
For additional support on using InqScribe and Final Cut Pro, review the FCP section of the InqScribe online user guide and the FCP section of the InqScribe Knowledge Base.
A final word about subtitles
Good subtitle work is subtle and done in a way that doesn’t distract from the emotion of the story. Here are a few tips to turn you into a subtitling master in FCP:
- When possible, stack the text into two lines on the screen, but no more than two lines at a time. Subtitles are quicker to read in chunks rather than one long string.
- When two people speak during one title, the second speaker’s text goes on the second line with a “-” before the text:
Hey Chad, do you like these subtitles?
-Yes, of course I do, Ben. Thanks for asking!
- Look for times when you can reasonably break one really full subtitle slide into several smaller, less full screens.
- Keep in mind that the average viewer will only be able to read 11 characters per second. This can help you determine how long a subtitle should be onscreen and how much text should be on each subtitle slide.
- In FCP, consider adding 3-5 frame spacing between each subtitle slide to increase readability.
The timing and cadence of subtitles is an art in and of itself and goes hand-in-hand with the video edit. Because of this, the final touches on your subtitles will most likely be done back in FCP as your film editing and post-production process unfolds. As other elements are added (SFX, music, etc.), you may need to finesse the duration of one title, break another into shorter ones, or stack lines on top of each other. That’s really the beauty of this system: Once the titles are in FCP you can edit the text and duration without any loss in quality to the text or the video.
I certainly hope this tutorial has been helpful. As always, there are many different workflows and methods to get the job done. Regardless of method, I hope this tutorial has impressed upon you the importance of taking the time to be organized during each step of any workflow. As beginning filmmakers, you will be required to wear multiple hats (director, editor, producer, etc.) and staying organized is the only way to efficiently balance all of these tasks, especially as your projects get bigger.
 About the author
Chad Braham is a media producer with over 13 years of professional broadcast and multimedia experience. He freelances as a videographer, video editor, and audio producer on projects ranging from :30 TV spots to documentary films. When not spending his days and nights in a dark editing bay, Chad (for some reason) enjoys following the Chicago Cubs.