InqScribe is popular among filmmakers for a variety of reasons. In our latest guest blog, Scott Squire shares his workflow to translate and create subtitles for his documentary.
by Scott Squire, Independent Producer & InqScribe user
Our movie, The Girl Who Knew Too Much is a feature documentary about women’s empowerment, the complexities of globalization and the crisis of mental health support in Nepal. We shot our movie over seven years on six different cameras, with varying degrees of asset management rigor. We ended up with nearly 200 hours of footage to be logged and/or translated and subtitled. This project taught us the value of having solid workflows—from managing footage in the field through the process of translation. We cannot stress the importance of having a process (that works with every camera!) before you shoot a single frame.

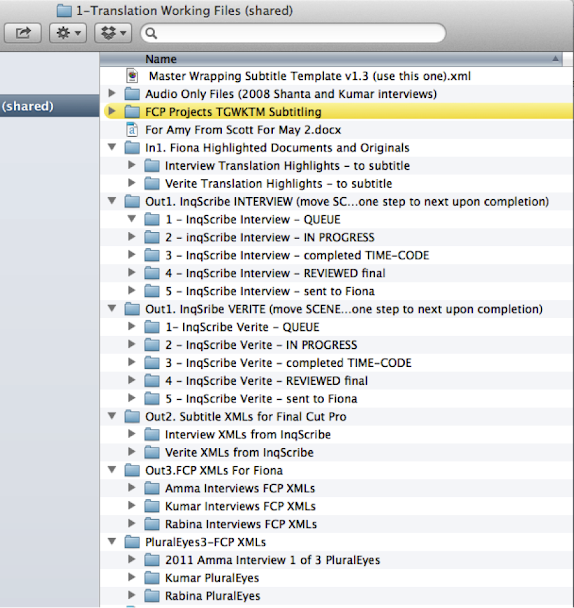
Our workflow includes the use of InqScribe and Final Cut Pro to produce translations and final subtitles for our movie. Critical to our process is having a clear folder/file structure that essentially depicts our workflow. I will refer to the folder/filenames used on our project, but obviously these would change based on your own project details.
Set up
We make sure that the top-level directory is accessible from all of our workstations. Our workflow begins with our editor placing callouts for the media that needs translating in the folder called In1. Fiona Highlighted Documents. Sometimes these are snippets from a clip, sometimes a whole reel. She reads our transcripts and highlights them, and then sends us scans of the highlighted pages as PDFs. (Unfortunately, on this project, we didn’t have InqScribe at the start, which means our original transcripts were in a variety of formats.)
Review the translation and verify timecode in InqScribe
We assemble all of the relevant translated files and then create an InqScribe document for each clip. Our workflow involves moving the InqScribe transcripts through a series of reviews by native speakers who verify the accuracy of the translation and the placement of timecodes. Timecode references should be at least at 10-second intervals (we recommend every 4-5 seconds). Be careful with InqScribe’s sensitive timecode selection so that you don’t timecodes out of order. And be sure to have opening AND closing timecodes in InqScribe or else your subtitles will run too long.
Export XML file from InqScribe to Final Cut Pro
Once the translation is complete and the timecodes are reviewed, we use InqScribe to export an XML file to be used in Final Cut Pro. It’s good to keep your XML template easy to access because you’ll be using it a lot. We keep ours at the top-level folder of our shared directory: /Master Wrapping Subtitle Template v1.3 (use this one).xml.
Instructions for creating a custom FCP 7 XML export template can be found in InqScribe’s Knowledge Base.
Very important is the naming of files. InqScribe will show the default name as “export.xml.” Click the “Choose” button to select a destination to save the file. Navigate to /Out2. Subtitle XMLs for Final Cut Pro > Interview XMLs from InqScribe. The name of the XML needs to match the file it came from. The best way to do this is to navigate to the original InqScribe file, select and copy the name (all but the “.inqscr” extension) and paste this into the pane of the export dialog. Double check your naming and destination—this is a big pain if you get it wrong. CONSISTENCY and ACCURACY in naming and filing are CRITICAL.
If you’re lucky, when you click “Export,” the export window will just close and your shiny new XML file will turn up in the proper place. If InqScribe alerts you to a non-consecutive timecode you will need to go back and correct where needed. The error will only tell you approximately where to start fixing first. Cancel out and go back to check all of the timecodes where the error message is indicated.
Import XML files to Final Cut Pro (FCP)
In Final Cut Pro, you will create a project (Subtitle_Master_Project) and import the first InqScribe XML file in the scene you just created. When you import the InqScribe XML, it will come into FCP as a sequence with the generic name that matches your text generator template (Master Wrapping Subtitle Template…). You must change this back to the name of the original file. As before, navigate back to the file and copy and paste the name in the FCP browser to replace the template name.
Drag the newly imported sequence into the timeline. It will contain only a subtitle track. Next, import the associated master footage or locate the clip and drag it into the FCP browser window. When the media clip has been imported, be sure it’s in the right folder inside the browser. Drag the clip into the timeline so that you have both footage (video and audio) AND a subtitle track above the video. These should be the same length, but there may be gaps in the transcription file. If the closing timecode was correctly input in the InqScribe file, the endpoint will match the end point of the media.
If you’ve done your job in InqScribe, the clip lengths should all match up and you’ll have a subtitled sequence! You can now export the sequence from Final Cut Pro as a XML to send to your editor.
 About the author
Scott Squire is a filmmaker who, along with his wife Amy Benson, is the producer of The Girl Who Knew Too Much.